Category: vSphere

vCenter 6.7 – Three ways to migrate external vCenter PSC to Embedded Mode

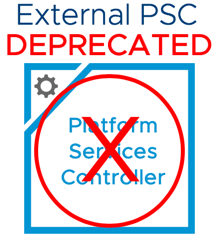
Announced in November 2018, the External Platform Services Controller (PSC) is being deprecated. If you are running vSphere 6.7 or vSphere 6.5 Update 2, you can now enjoy the benefits of using embedded PSC deployments without the hassle and complexity of extra nodes or load balancers. However, this means you will now need to join your PSC with your vCenter server only if the PSC is currently external. This guide will walk you through on three different ways to get the job done.

Tips and Recommendations

  • Also included in vSphere 6.7 Update 1 and above is the repoint tool. A stand-alone embedded deployment can join or leave a vSphere SSO Domain. This helps provide flexibility for data center moves, acquisitions, or mergers. The vSphere team commitment is to ensure vCenter Server complexity is minimized while also delivering the tools required so that architectural choices can be changed as an organization evolves.
  • Once you have everything up and running the way it should

Use built-in user interface for vCenter 6.7 Update 2

Easiest method by far. This requires you to upgrade your vCenter to version 6.7 Update 2 first. Then login to the HTML5 Client and go to Home > Administration > System Configuration and select the Converge to Embedded option. Then once everything is converged, you will need to select the Decommission PSC option. For more details and full instructions, you can see the post below

https://davidstamen.com/2019/04/11/vcenter-server-converge-tool-how-do-i-converge-an-environment-using-the-ui/

Use CLI for vCenter 6.7 Update 1 and above

You will need to upgrade your vCenter Server to version 6.7 Update 1 and above, then locate the converge tool inside the vCenter ISO. This method is a lot more difficult than the above method but can be an alternative if the user interface method doesn’t work, or for some reason you are not able to upgrade to vCenter 6.7 Update 2 or above. Instructions and details about the process are below.

https://blogs.vmware.com/vsphere/2019/02/understanding-the-vcenter-server-converge-tool.html

https://nolabnoparty.com/en/vcenter-server-6-7-converge-tool-embed-external-psc-into-vcsa/

Build new vCenter Server Environment and Migrate

Use this option only when all else fails or if you feel the need to start from scratch again or your old environment has stability issues. This is the longest method but might be the perfect method for environments that doesn’t have only a few hosts to migrate.

The Vmware Official way of migrating a vCenter with VDS switch: https://kb.vmware.com/kb/1029498

A quicker unsupported way of migrating vCenter with VDS switch: http://www.vmignite.com/2016/03/how-to-migrate-host-and-vms-from-vcenter-5-to-a-vcenter-6-server/

twitterpinterestlinkedinmail


vSphere – 10 ways to Migrate a Virtual Machine

This guide is written for those who need all methods of migrating, cloning, cross vMotion, and just moving a VM period. Please use your best judgement as this is a list of other options when options A, B, and C doesn’t work. Hopefully this blog post will save the day for many folks out there, as most of the time 90% of your VMs should migrate without a problem. This list is for the remaining 10% that just won’t move even after following all the requirements.


Disclaimer: For educational purpose only, use your best judgment and test it with a test machine before you actually do it in production!


Prerequisites Links

  1. For Cross vCenter Migration and Cloning in vSphere 6.0 https://kb.vmware.com/s/article/2106952
  2. Long Distance vMotion requirements https://kb.vmware.com/s/article/2106949


Useful Links

  1. Great blog post on vMotion deep dive https://vmarena.com/vmware-vmotion-vsphere-6-5/
  2. Upgrade, Migrating best practices https://sivasankar.org/2018/1288/upgrading-migrating-from-vsphere-5-x-to-6-x-best-practices/
  3. How to vMotion between different VDS switches https://www.virtuallyghetto.com/2018/09/vmotion-across-different-vds-version-between-onprem-and-vmc.html

The Obvious Choices

  1. Migrate a VM using vMotion
    • If there is shared storage, all you need to do is change compute resource only
    • If there is no shared storage, you will need to select Change both compute resource and storage. This method is more time consuming as it will copy the entire VM contents over to the new datastore


  2. Clone the VM to the new environment
    • Just clone the VM to the new environment. Power off the original VM and then power on the cloned one.


The other methods when all else doesn’t work

Below are methods when all else fails. Once again, I will need to put in a disclaimer

Disclaimer: For educational purpose only, use your best judgment and test it with a test machine before you actually do it in production!

    1. Disconnect the Host and reconnect it to the new environment
    2. Use Cross vCenter Workload Migration Utility Fling


  1. Use your backup software to do a full backup of the VM and restore it to the new destination
    • Why not leverage what you already pay for. If you don’t have a backup solution, now is a time to try out some free trials
    • Safe method as the original VM is still intact

  2. Use shared Datastore to migrate VMs over to the new environment
    • Basically, you need to work with your storage guy to span the storage so that both sites can see it.
    • If you can get all the new and old host on the same cluster you can do a simple and quick vMotion
    • If they are on separate clusters, you will need to power off the VM. Remove the VM from inventory (DO NOT DELETE THE VM). Browse for the VMX file in the datastore and re-add it to inventory in the new environment.
    • Tips: make sure you know what the name of the VM folder is in the datastore. Sometimes the VM name and the folder name inside the datastore are different.
  3. Export the VM to OVF Template from the original destination and reimport it back in to the new destination
    • The VM has to be turned Off but exporting it to a local machine or a jump box is a very safe method as it doesn’t affect the original VM. However, the process is time consuming.
    • Using the vSphere Client, look for the Export OVF Template

  4. Use VMware HCX
  5. Use vSphere Replication or Fault Tolerance
    • Both of these are free and they are similar to the cloning method however these methods give you a lot more flexibility.
    • Fault Tolerance is an active/active clone of your VM, therefore you can make the switch anytime you need to without losing a second of data.
    • vSphere Replication will continuously sync the changes you make to your primary VM to the powered off clone. Buying you time to switch when over at a later time.
  6. Copy the entire VM Folder in the Datastore
    • This is the longest method by far and can be done when exporting to OVF doesn’t work. Basically, all you do is Browse for the Datastore where the VM is in and then copy the VM folder. Then upload it back to another datastore and register the VMX file.

If you have other methods, please share your comments below. Also comment if you have found this helpful.

twitterpinterestlinkedinmail


vCenter 6.7 – How to backup and restore vCenter

First introduced in vSphere 6.5, the built-in file-based backup and restore is a native backup solution that is available within the VMware Appliance Management Interface on port 5480. It supports backing up both the vCenter Server Appliance and Platform Services Controller (PSC). There is no need for any type of backup agents, nor is any quiescing or downtime of the VCSA or PSC required. The backup files are then streamed to a backup target using one of the supported protocols: FTP(s), HTTP(s), and SCP. These are all the files that make-up the VCSA, including the database.

Restoring the VCSA or PSC only requires mounting the VCSA ISO used during its deployment. Select the restore option and point to the backup protocol used. The restore workflow first deploys a new appliance, retaining its original identity. This is key since other solutions communicating to the VCSA will continue to do so as its UUID remains the same. Then it imports the backup files from the selected backup bringing the VCSA back online. This guide is written to show how to backup and restore vCenter 6.7.

I have broken up the steps into 3 parts.

  1. Create an FTP Backup Server
  2. Backup vCenter
  3. Restore vCenter

Step 1: Create an FTP Backup Server

  1. Download FileZilla Server https://filezilla-project.org/
  2. Run the installer on your Windows Server

  3. Click on Next
  4. Click on Next
  5. Click on Next
  6. Click on Install
  7. In the following steps, we will need to create a local account to be able to access the FTP Server. Click on the Users Icon on the top
  8. Click on Add
  9. Create a local user account to access the FTP server
  10. Create a password for better security
  11. Click on Shared Folders and click on Add
  12. I’ve pre-created a folder called vCenter_Backup and selected it
  13. Check all the boxes on Files and Directories

Step 2: Backup vCenter Server Appliance

  1. Login go your vCenter Appliance Manager http://FQDH:5480. Login as Root
  2. Click on Backup > Configure
  3. Enter the backup location and username and password (Note we will keep the default backup schedule for now)
  4. Since we want a backup file now, we will click on Backup Now
  5. Check the first check box which will prefill all the information for us. You must enter the password however and then click on Start
  6. Wait till the backup is completed
  7. Verify there is a backup folder

Step 3: Restore vCenter Server

  1. The Restore Wizard is located in the VCSA ISO. Open the VSCA ISO and double click on vcsa-ui-install > Win32 > Installer.exe
  2. Click on Restore
  • Click on Next
  • Accept the User Agreement and click on Next
  • In this procedure I had to enter in just the root of my FTP shared folder
  • This led me to this screen where I had to select the backup folder
  • Now that the full download path is there, we can click on Next
  • Review and then click on Next
  • Enter in the username and password on where you want to install the appliance


  • Enter in a root password
  • Here you can change the sizing if you like. Click on Next
  • Select a datastore and click on Next
  • Choose the same or change the IP address here and click on Next
  • Review and click on Finish
  • A new appliance will now be deployed
  • Once Stage 1 is completed we will need to run Stage 2 of the restore. Open a browser and go to Http://FQDN:5480. Click on Restore
  • Login to the VCSA as root
  • Enter in the path of the backup file
  • Review and click on Finish

  • Click on OK. Once completed you can power on your vCenter and see all your settings restored
twitterpinterestlinkedinmail


vCenter 6.7 – Install guide with useful tips and links

vCenter 6.7 has a few new features, numerous enhanced features, and some performance improvements. Some of my favorite features are improved HTML5 client, improved vCenter backup management, and improved performance monitoring out of the box. This guide will show you how to install vCenter 6.7 in embedded mode. Also there will be useful links and tips as well. Future post will include a full guide on how to do vCenter built-in HA, file based backup and restore of vCenter, and more.

vCenter 6.7 Tips

  1. vSphere 6.7 and vSphere 6.5 Update 2 introduced enhanced linked mode support for embedded PSC deployments therefore do not use external PSCs as they will be depreciated.  vSphere 6.7 Update 1 and above has a converged utility to converge the external PSC back to the vCenter Appliance.
  2. To migrate/update to vCenter 6.7, you must have vCenter 6.0 or vCenter 6.5. vCenter 5.5 is not supported
  3. Leverage the built-in HA for vCenter https://blogs.vmware.com/vsphere/2018/04/vcenter-high-availability-deep-dive-part-1.html
  4. Test vCenter 6.7 with the free Hands On Lab http://labs.hol.vmware.com/HOL/catalogs/lab/4741?src=WWW_us_MY_ZKH3m8ceDwArRBzgUFk4&int_cid=70134000001Caa8


vCenter 6.7 Features and Useful Links

What is New

https://www.vmware.com/content/dam/digitalmarketing/vmware/en/pdf/products/vsphere/vmware-whats-new-in-vsphere-whitepaper.pdf

Upgrade Consideration

https://blogs.vmware.com/vsphere/2018/04/upgrade-considerations-vmware-vsphere-6-7.html

External PSCs going away

https://blogs.vmware.com/vsphere/2018/11/external-platform-services-controller-a-thing-of-the-past.html

Release Notes

https://docs.vmware.com/en/VMware-vSphere/6.7/rn/vsphere-esxi-vcenter-server-67-release-notes.html

vCenter 6.7 Sizing


Step 1: Adding DNS Entry for vCenter Appliance

  1. Go to your DNS Server and manually add the FQDN for your vCenter Appliance


Step 2: Install vCenter 6 Appliance

  1. Open the VSCA ISO and double click on vcsa-ui-install > Win32 > Installer.exe
  2. Click on Install
  3. Click on Next
  4. Accept the License and click on Next
  5. Select your platform and click on Next
  6. Enter the ESXi Host you would like to install the appliance to and click on Next
  7. Click on Yes
  8. Enter the vCenter Appliance name and password
  9. Select the Appliance size and click on Next
  10. Select Datastore and click on Next
  11. Enter the network information and click on Next
  12. Verify everything and click on Finish
  13. Wait till the deployment is complete
  14. We get a message that Stage 2 cannot be completed. We will need to open a browser and go to htts://FQDN:5480
  15. Click on Setup
  16. Click on Next
  17. Verify the Applicance information and click on Next
  18. Enter the password for vCenter Login and click on Next
  19. Click on Next
  20. Verify all the information and click on Finish
  21. Click on OK once the warning shows up
  22. Installation will begin


Step 3:

Enter vCenter Server License

  1. Open a browser and enter the FQDN of the vCenter Server. Click on Launch vSphere Client (HTML5)
  2. Login as Administrator@vsphere.local and the SSO password we set earlier
  3. Select Home > Licensing
    > + Add New Licenses
  4. When you are done you should see your license key
twitterpinterestlinkedinmail


How to Install, configure, and use vCenter Infrastructure Navigator

vCenter Infrastructure Navigator is a must have tool for any vSphere environment. Lot of my customers don’t even know much about the tool until I show them a demo and they immediately want it. Since vSphere already manages all your virtual servers, it just makes senses to have a tool that can detect what applications are installed on each server and to be able to search based on applications. For example, if I wanted to know how many SQL servers I have in my environment I can just type in SQL in the search box and it will pull all servers that have SQL installed. Now if your manager comes up to you and ask you what servers are linked to that one particular SQL server or better yet he ask you to delete a server that he believes no one else is using, how can you be confident to get him an exact answer. This is where Dependency mapping comes in. VIN automatically detects incoming and outgoing servers that talk to that particular server and even draws a fancy diagram for you as well. As an added bonus it even list the port numbers and the name of the process. This is why it is a must-have tool for any VMware Engineer. Below is a step by step guide on how to configure VIN and how to make the most out of the tool.


Prerequisites and Notes

  1. Make sure you install VIN on the same cluster as your vCenter Server
  2. Each instance of vCenter will need its own VIN server
  3. VIN licenses is required and should work using almost any Suite license key.


Configuring vCenter Infrastructure Navigator

  1. Log into the vCenter Web Client at https://{FQDN of vCenter}/vsphere-client


  2. Click Licensing


  3. Click Solutions, and the click VMware vCenter Infrastructure Navigator.


  4. Click Assign License Key.


  5. Click Assign a new license key, enter License key, and then click OK.


  6. Click Home -> Infrastructure Navigator.


  7. Click Settings, and then Turn on access to VMs


  8. Enter the credentials and then click OK.


  9. Check the status, make sure the green check for Access to the VMs is On appears.


Discovering Applications in vCenter

In this demonstration we will show you how to discover how many IIS servers you have in your vCenter environment.


  1. Login to vCenter Web Client


  2. Click on Host and Clusters


  1. Select your vCenter Server and click on Summary


  2. View the Infrastructure Navigator box


  3. Expand Web Servers to see how many IIS server we have in total


  4. Click on Show all in inventory to view all the servers


  5. In the filter box, type in IIS to view all the IIS servers


    This method is an easy and quick way of viewing application services, you can filter it out by SQL, Exchange, Appache, and more.


Viewing Dependencies

Viewing dependencies is a great way to see if a server is linked to any other server. This becomes very useful for example if you want to delete a VM but not sure if it will break any other applications or for knowing what ports and VMs are linked to that particular VM. This would be hard to do manually without VIN.

In this example we want to see what servers are linked to vCAC iAAS server.

  1. Login to vCenter Web Client


  2. Do a search for your VM in the search box


  3. In the summary page view the Infrastructure Navigator box and expand Applications Dependencies to view Incoming and Outcoming servers


  4. Click on Show dependencies


  5. The arrows and lines shows you the Incoming and Outgoing dependencies (left side is incoming and right side is outgoing)


Adding Unknown Services


  1. Click on Services on the bottom of the page and check the box Show unknown services with no incoming dependencies


  1. You have the option of selecting a known port such as Port 22 and click on the button


  2. Since we know that this port that is running the process sshd is an SSH port we can label it accordingly. Click on OK to add it to the known list.


  3. Our new port will now be shown in the bottom


  4. It will also be shown in the boxes as well


  5. Under Map View, change it to Table View


  6. You can view the same mapping in a different view


twitterpinterestlinkedinmail


vCenter Stretch Metro Cluster Configuration Part 2 – Configuring Host, Groups, and Storage DRS for VMSC

Configure the Host for a Stretch Cluster

With the release of vSphere 5.5, an advanced setting called Disk.AutoremoveOnPDL was introduced. It is implemented by default. This functionality enables vSphere to remove devices that are marked as PDL and helps prevent reaching, for example, the 256-device limit for an ESXi host. However, if the PDL scenario is solved and the device returns, the ESXi host’s storage system must be rescanned before this device appears. VMware recommends disabling Disk.AutoremoveOnPDL
in the host advanced settings by setting it to 0.

  1. Before you begin make sure you add all your host and enable EVC accordingly
  2. Select a Host and click on Manager > Settings > Advanced System Settings > Disk.AutoremoveOnPDL >
  3. Change AutoremoveONPDL to 0 and click on OK
  4. Repeat the following for each host in the Stretch Cluster

Creating Virtual Machine and Host Groups

VMware recommends manually defining “sites” by creating a group of hosts that belong to a site and then adding VMs to these sites based on the affinity of the datastore on which they are provisioned. VMware recommends automating the process of defining site affinity by using tools such as VMware vCenter Orchestrator™ or VMware vSphere PowerCLI™. If automating the process is not an option, use of a generic naming convention is recommended to simplify the creation of these groups. VMware recommends that these groups be validated on a regular basis to ensure that all VMs belong to the group with the correct site affinity.

  1. Select the stretch cluster and select Manage à Settings à VM/Host Groups à Add

  2. Provide a name for Virtual Machines in Site A and make sure the Type is a VM Group
  3. Click on Add
  4. Add your VMs for Site A and click on OK
  5. Click on OK to save the settings
  6. Now we need to create a Host Group, click on Add

  7. Configure the following
    1. Enter a name for Site A Host and
    2. Change the Type to Host Group
    3. Click on Add
  8. Select the Host for Site A and click on OK
  9. Click on OK to save
  10. Next we need to create a VM to Host Rule to make sure our Site A virtual machines stay only on Site A Host. Click on VM/Host Rules > Add
  11. Configure the rule
    1. Enter a name
    2. Change the Type to Virtual Machines to Hosts
    3. Change the VM Group to Site A Virtual Machines
    4. Select Should run on hosts in group
    5. Change Host Group to Site A Host
    6. Click on OK to save
  12. Repeat the entire process again for Site B this time creating Virtual Machines for Site B and Host from Site B

Configuring vSphere Strorage DRS for Stretch Cluster

vSphere Storage DRS enables aggregation of datastores to a single unit of consumption from an administrative perspective, and it balances VM disks when defined thresholds are exceeded. It ensures that sufficient disk resources are available to a workload. VMware recommends enabling vSphere Storage DRS with I/O Metric disabled. The use of I/O Metric or VMware vSphere Storage I/O Control is not supported in a vMSC configuration, as is described in VMware Knowledge Base article 2042596.

vSphere Storage DRS uses vSphere Storage vMotion to migrate VM disks between datastores within a datastore cluster. Because the underlying stretched storage systems use synchronous replication, a migration or series of migrations have an impact on replication traffic and might cause the VMs to become temporarily unavailable due to contention for network resources during the movement of disks. Migration to random datastores can also potentially lead to additional I/O latency in uniform host access configurations if VMs are not migrated along with their virtual disks. For example, if a VM residing on a host at site A has its disk migrated to a datastore at site B, it continues operating but with potentially degraded performance. The VM’s disk reads now are subject to the increased latency associated with reading from the virtual iSCSI IP at site B. Reads are subject to intersite latency rather than being satisfied by a local target.

To control if and when migrations occur, VMware recommends configuring vSphere Storage DRS in manual mode. This enables human validation per recommendation as well as recommendations to be applied during off-peak hours, while gaining the operational benefit and efficiency of the initial placement functionality.

VMware recommends creating datastore clusters based on the storage configuration with respect to storage site affinity. Datastores with a site affinity for site A should not be mixed in datastore clusters with datastores with a site affinity for site B. This enables operational consistency and eases the creation and ongoing management of vSphere DRS VM-to-host affinity rules. Ensure that all vSphere DRS VM-to-host affinity rules are updated accordingly when VMs are migrated via vSphere Storage vMotion between datastore clusters and when crossing defined storage site affinity boundaries. To simplify the provisioning process, VMware recommends aligning naming conventions for datastore clusters and VM-to-host affinity rules.

  1. Click on Home > Storage

  2. Right click on your Datacenter and select Storage > New Datastore Cluster
  3. Provide a name for your Datastore cluster
  4. Set Cluster automation level to No Automation (Manual Mode)
  5. Uncheck Enable I/O metric for SDRS recommendations and click on Next
  6. Select your Stretch Cluster and click on Next
  7. Add your datastores and click on Next
  8. Click on Finish
    /li>
twitterpinterestlinkedinmail


vCenter Stretch Metro Cluster Configuration Part 1 – Configuring the Cluster for vMSC

VMware vSphere® Metro Storage Cluster (vMSC) is a specific configuration within the VMware Hardware Compatibility List (HCL). These configurations are commonly referred to as stretched storage clusters or metro storage clusters and are implemented in environments where disaster and downtime avoidance is a key requirement. This best practices document was developed to provide additional insight and information for operation of a vMSC infrastructure in conjunction with VMware vSphere. This guide was created based on VMware vSphere 6 recommended best practices for Stretched Metro clusters which can be found here https://www.vmware.com/resources/techresources/10482

Configuring a new Stretch Cluster

vSphere HA Consideration

A full site failure is one scenario that must be taken into account in a resilient architecture. VMware recommends enabling vSphere HA admission control. Workload availability is the primary driver for most stretched cluster environments, so providing sufficient capacity for a full site failure is recommended. Such hosts are equally divided across both sites. To ensure that all workloads can be restarted by vSphere HA on just one site, configuring the admission control policy to 50 percent for both memory and CPU is recommended.

VMware recommends using a percentage-based policy because it offers the most flexibility and reduces operational overhead. Even when new hosts are introduced to the environment, there is no need to change the percentage and no risk of a skewed consolidation ratio due to possible use of VM-level reservations

  1. Right click on your Datacenter and select New Cluster

  2. Configure the New Cluster
    1. Enter a Name for the cluster
    2. Check Turn ON next to DRS
    3. Check Turn ON next to vSphere HA
    4. Under policy change the Percentage of cluster resources reserved as failover spare capacity
      1. Set Reserved failover CPU capacity to 50%;
      2. Set Reserved failover Memory Capacity to 50%
      3. Click on OK

vSphere HA Advance Settings

In these next steps, one of these addresses physically resides in the Site A data center; the other physically resides in Site B data center. This enables vSphere HA validation for complete network isolation, even in case of a connection failure between sites. In the next few steps we are going to configure multiple isolation addresses. The vSphere HA advanced setting used is das.isolationaddress. More details on how to configure this can be found in VMware Knowledge Base article 1002117.

The minimum number of heartbeat datastores is two and the maximum is five. For vSphere HA datastore heartbeating to function correctly in any type of failure scenario, VMware recommends increasing the number of heartbeat datastores from two to four in a stretched cluster environment. This provides full redundancy for both data center locations. Defining four specific datastores as preferred heartbeat datastores is also recommended, selecting two from one site and two from the other. This enables vSphere HA to heartbeat to a datastore even in the case of a connection failure between sites. Subsequently, it enables vSphere HA to determine the state of a host in any scenario.

Adding an advanced setting called das.heartbeatDsPerHost can increase the number of heartbeat datastores.

  1. Select your Cluster and click on Manager > Settings > vSphere HA > Edit
  2. Configure vSphere HA advance settings
    1. Check the box Protect against Storage Connectivity Loss
    2. Click on dropdown next to Advanced Options
    3. Click on Add
    4. Add the following values
      1. Enter das.isolationaddress0= (Additional pingable IP address for Site A)
      2. Enter das.isolationaddress1= (Additional pingable IP address for Site B)
      3. das.heartbeatDSPerHost = 4

Datastore Heartbeating

To designate specific datastores as heartbeat devices, VMware recommends using Select any of the cluster datastores taking into account my preferences. This enables vSphere HA to select any other datastore if the four designated datastores that have been manually selected become unavailable. VMware recommends selecting two datastores in each location to ensure that datastores are available at each site in the case of a site partition.

  1. Expand Datastore for Heartbeating and select Use datastores from the specified list and complement automatically if needed

Permanent Device Loss and All Paths Down Scenarios

As of vSphere 6.0, enhancements have been introduced to enable an automated failover of VMs residing on a datastore that has either an all paths down (APD) or a permanent device loss (PDL) condition. PDL is applicable only to block storage devices.

A PDL condition, as is discussed in one of our failure scenarios, is a condition that is communicated by the array controller to the ESXi host via a SCSI sense code. This condition indicates that a device (LUN) has become unavailable and is likely permanently unavailable. An example scenario in which this condition is communicated by the array is when a LUN is set offline. This condition is used in nonuniform models during a failure scenario to ensure that the ESXi host takes appropriate action when access to a LUN is revoked. When a full storage failure occurs, it is impossible to generate the PDL condition because there is no communication possible between the array and the ESXi host. This state is identified by the ESXi host as an APD condition. Another example of an APD condition is where the storage network has failed completely. In this scenario, the ESXi host also does not detect what has happened with the storage and declares an APD.

To enable vSphere HA to respond to both an APD and a PDL condition, vSphere HA must be configured in a specific way. VMware recommends enabling VM Component Protection (VMCP). After the creation of the cluster, VMCP must be enabled

  1. Under Host Hardware Monitoring – VM Component Protection, check the box next to Protect against Storage Connectivity Loss

Permanent Device Loss (PDL) and All Paths Down (ADP) Settings

The configuration for Permanent Device Loss (PDL) is basic. In the Failure conditions and VM response section, the response following detection of a PDL condition can be configured. VMware recommends setting this to Power off and restart VMs. When this condition is detected, a VM is restarted instantly on a healthy host within the vSphere HA cluster.

For an APD scenario, configuration must occur in the same section, as is shown in Figure 8. Besides defining the response to an APD condition, it is also possible to alter the timing and to configure the behavior when the failure is restored before the APD timeout has passed.

When an APD condition is detected, a timer is started. After 140 seconds, the APD condition is officially declared and the device is marked as APD timeout. When 140 seconds have passed, vSphere HA starts counting. The default vSphere HA timeout is 3 minutes. When the 3 minutes have passed, vSphere HA restarts the impacted VMs, but VMCP can be configured to respond differently if preferred. VMware recommends configuring it to Power off and restart VMs (conservative).

Conservative refers to the likelihood that vSphere HA will be able to restart VMs. When set to conservative, vSphere HA restarts only the VM that is impacted by the APD if it detects that a host in the cluster can access the datastore on which the VM resides. In the case of aggressive, vSphere HA attempts to restart the VM even if it doesn’t detect the state of the other hosts. This can lead to a situation in which a VM is not restarted because there is no host that has access to the datastore on which the VM is located.

If the APD is lifted and access to the storage is restored before the timeout has passed, vSphere HA does not unnecessarily restart the VM unless explicitly configured to do so. If a response is chosen even when the environment has recovered from the APD condition, Response for APD recovery after APD timeout
can be configured to Reset VMs. VMware recommends leaving this setting disabled.

  1. Configure the following
    1. Click on the dropdown under Failure conditions and VM response
    2. Change the Response for Host Isolation to Power off and restart VMs
    3. Change the Response for Datastore with Permanent Device Loss (PDL) to Power Off and restart VMs
    4. Change the Response for Datastore with All Paths Down (APD) to Power Off and restart VMs (conservative)


Next we need to configure the Host settings, Groups, and Storage DRS settings

twitterpinterestlinkedinmail


How to Install vCenter 6 Appliance

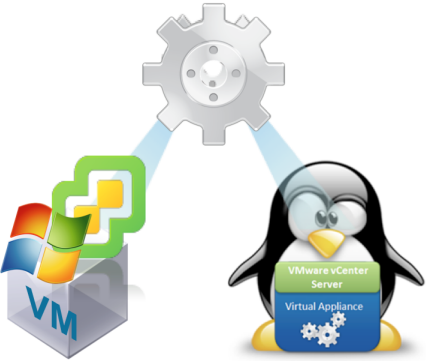
VMware vCenter 6 Appliance now scales out just as good as the full blown Windows version therefore it may be a good idea to switch to the vCenter Appliance. The following guide will show you how to install the vCenter 6 Appliance using the embedded vPostgres database.


  1. Open the VSCA ISO that you downloaded from VMware.com and open the vcsa folder

  2.  

  3. Install the Vmware Client Integration Plugin
  4.  

  5. After it is installed, go back to the ISO folder and click on vsca-setup.html
  6.  

  7. Click on Yes if prompt


  8.  

  9. Click on Allow if prompt

  10.  

  11. Click on Install

  12.  

  13. Enter the ESXi Host you would like to install the appliance to and click on Next
  14.  

  15. Click on Yes


  16.  

  17. Enter the vCenter Appliance name and password (make sure it is already registered in DNS)
  18.  

  19. Select your platform and click on Next
  20.  

  21. Enter a SSO password, Domain, and site name and click on Next
  22.  

  23. Select the Appliance size and click on Next
  24.  

  25. Select Datastore and click on Next
  26.  

  27. Select your database and click on Next
  28.  

  29. Enter the network information and click on Next
  30.  

  31. Verify everything and click on Finish
  32.  

  33. Wait till the deployment is complete
  34.  

  35. Open a browser and enter the FQDN of the vCenter Server and click on Log in to vSphere Web Client


  36.  

  37. Login as Administrator@vsphere.local and the SSO password we set earlier
twitterpinterestlinkedinmail


How to Migrate Host and VMs from vCenter 5 to vCenter 6

With the Introduction of Platform Service Controller in vSphere 6, building a whole new vCenter 6 environment might make more sense than to upgrade in many cases. For example in environments where we want to move from a vCenter Windows deployment to a vCenter Appliance deployment or to start over from scratch with external PSCs in HA mode.

This guide shows you how to migrate Host and VMs on a vCenter with a DVS switch quickly without any downtime (alternative method). Please note this is just another way of migrating vCenters with DVS switches and is not supported by VMware. The official way of doing this migration that is supported by VMware is on this link https://kb.vmware.com/kb/1029498


Prerequisites and Important Tips

  1. Once again I must emphasize that the following guide is not supported by VMware
  2. This guide only applies if you are running a vDS switch
  3. VMFS-3 has been deprecated in vSphere 6
  4. Make sure you recreate the Datacenters and cluster in the new vCenter 6 environment. Set up the HA settings for the Cluster as well prior to host migration
  5. DRS and Storage DRS needs to be set to manual or disabled on both vCenters during the entire process
  6. It’s important to test one host and some non-important VMs first to verify that the process will work. Make sure to open a command prompt and do a continuous ping on the test VMs and the host to make sure they don’t lose network connectivity in any part of the process.
  7. Moving the VMs will not save your folders and permissions structure. You can use powershell scripts on the following blog http://virtuallyjason.blogspot.com/2015/02/copying-vm-folders-and-permissions-from.html
  8. It is recommended to license the new vCenter site with ESXi and vCenter license.


Step 1: Migrating the DVS switch

A DVS switch can easily have over 20+ Portgroups, each with different VLANs. Rather than recreate this from scratch in the vCenter 6 environment, it will be much easier if we just export the DVS configuration from our vCenter 5 environment and import it to the vCenter 6 environment.

  1. Login to the vCenter Web Client on the 5.x environment


  2. Click on Home > Networking


  3. Right click on the DVS switch and click on All vCenter Actions > Export Configuration


  4. Select Distributed switch and all port groups and Click on OK


  5. Click on Yes to save the DVS configuration


  6. You should now have a zip file backup of your DVS switch. Repeat these steps to export all DVS switches if you have more than one.


Step 2: Importing DVS switch to new vCenter 6.x Environment

  1. Login to the vSphere Web Client on the new vCenter 6 environment


  2. Click on Home > Networking
  3.  

  4. Right click on the Datacenter or Cluster we want to import the switch to and select Distributed Switch > Import Distributed Switch


  5. Browse for the file and make sure Preserve original distributed switch and port group identifiers is checked and click on Next


  6. Verify that the number of port groups match the original and click on Finish


Step 3: Migrating the Host

Next we will need to migrate the host from vCenter 5 environment to the vCenter 6 environment.

  1. Make sure DRS and Storage DRS is disabled or set to manual on both environments before we begin.


  2. Login to the vSphere 5 Web Client


  3. Go to Home > Hosts and Clusters


  4. Right click on a Host we want to migrate and select Disconnect


  5. Right click on the Host again and select All vCenter Actions > Remove from Inventory


  6. Now go to the vCenter 6 Web Client and right click on the Cluster you want to import the Host to and select Add Host


  7. Follow the prompts to import the host and do a ping test on your VMs to make sure they are still online.


Step 4: Registering Host and VMs to DVS switch on our vCenter 6 environment

The following next few steps have to be done very carefully and a high knowledge of DVS switches is highly recommended. Also it is recommended to do continuous ping test throughout the process to make sure nothing breaks during the entire process.

  1. Next we need to add our host to the DVS switch. Go to Home > Networking


  2. Right click on the VDS switch we imported previously and select Add and Manage Hosts


  3. Select Add Host and manager host networking (advanced) and click on Next


  4. Click on New Hosts


  5. Select your Host and click on OK


  6. Click on Next


  7. Select Manager Physical Adapters, Manage VMkernel Adapters, and Migrate virtual machine networking and click on Next


  8. Highlight the Uplinks on the original DVS switch and click on Assign uplink


  9. Select an available uplink and click on OK


  10. Repeat the process for both original DVS uplinks (if you have more than one). Important! Verify
    you have Uplink Port Group for your DVS
    and then click on Next
  11.  

  12. Very Important!
    If you had VMkernel network adapters on your DVS switch make sure you switch them over to your new Destination Port Group. If you had any or all your VMkernel network adapters on a standard vSwitch then you don’t need to migrate anything on a standard vSwitch. Check your settings carefully and then click on Next.

    (In the example below all our VMKernel are on a vSwitch so there was no need to migrate)


  13. Review the impact and click on Next


  14. For each VM, we need to set each Destination Port Group to the same name as the Source Port Group. Once again review your settings to make sure each VM has a Destination Port Group. The Source Port Group and the Destination Port Group name should match because we exported the DVS switch over. Click on Next once you verified all VMs has a matching Destination Port Group
  15.  

  16. Review the settings and click on Finish


  17. Very important, look at the recent task and make sure all the VMs switched properly. If any of them errored out. Right click on the VM and manually switch the VM networking.


  18. Test and ping your Host and VMs again to make sure they haven’t lost connectivity


  19. If everything is successful, repeat the process for all the other host. Take your time to review each and every setting carefully. Once again this method of migrating is not supported by VMware. Do everything on your own risk!
twitterpinterestlinkedinmail


ESXi 6 Host Hardening Guide

The following guide will quickly show you how to harden your vSphere 6 Host based on VMware’s Security Hardening guides which can be found here. The official hardening guides are in an excel format with detailed descriptions. This guide walks you through all the steps, screenshot by screenshot without reading through the excel spreadsheet. I will post Virtual Machine hardening in a future time.

  1. Login to vCenter Web Client with administrative credentials

  2. Click on a Host and select Manager > Settings > Advanced System Settings
  3. Verify that the Syslog.global.logDir and Syslog.global.logHost values should not be the default of /scratch/log. Enter a log server if applicable

  4. Make sure UsersVars.DcuiTimeOut is set to 600 (default 600)
  5. Make sure UserVars.ESXiShellInteractiveTimeOut and UserVars.ESXiShellTimeOut is set to a value greater than the default of 0

  6. Make sure Mem.ShareForceSalting is set to a value of 2

  7. Change the following for Security
    1. Security.AccountLockFailures to 3
    2. Security.AccountUnlockTime to 900
    3. Security.PasswordQualityControl to retry=3 min=disabled,disabled,disabled,7,7

  8. Make sure Config.HostAgent.plugins.solo.enableMob is set to a value of false
  9. Now navigate to Manage > Settings > Security Profile
  10. Make sure SNMP Server under Services section is set to Stopped if you are not suing SNMP in your environment.

  11. Scroll down to the bottom and change the Host Image Profile Acceptance Level to either VMware Accepted or VMware Certified
  12. Under Firewall, all Incoming Connections and Outgoing connections should not be set to All. Set what IP Addresses are allowed to communicate with those services instead.

  13. Under Lockdown Mode make sure Lockdown Mode is Enabled (Strict) and Exception Users are added accordingly.

  14. Navigate to System > Time Configuration on the left menu and make the following:
    1. NTP Client is Enabled
    2. NTP Service Status is Running
    3. NTP Servers are set with NTP Servers

  15. Navigate to Authentication Services and verify that Domain and Trusted Domain Controller settings are configured as appropriate

  16. Now navigate to Manage > Storage > Storage Adapters and for EACH iSCSI Adapter, scroll for Authentication section under Adapter Details section > Properties tab. The Method parameter should be set to Use bidirectional CHAP
  17. Once you completed the host hardening make sure everything is working such as vMotion, DRS, etc. Once you verify everything is working, it is highly recommended to create a Host Profile from the host and remediate it out to the other host in your environment. Also export the Host Profile as well so all you work isn’t lost.
twitterpinterestlinkedinmail


vCenter Support Assistant Configuration Guide

A must have free plug-in for any environment that runs vCenter. VMware vCenter Support Assistant accelerates Support Request resolution by allowing you to easily create and track support request through vCenter. It also can provide proactive alerts and recommended fixes for technical issues even before the problem occurs. This guide will show you how to configure VMware Support Assistant starting first with listing the benefits of vCenter Support Assistant below.

Proactive Support & Prevention

  • Receive proactive alerts and recommended fixes: Automatic notifications within vCenter keep you up-to-date on any issues and provide you with recommended solutions.
  • Transmit selected log files automatically: Selected log files are collected and regularly transmitted to VMware Tech Support and matched to a dynamic list of known issues sourced from hundreds of thousands of customers.
  • Configure data collection times: vCenter Support Assistant allows you to set the collection frequency and time of day to minimize impact on your system’s performance.

Reactive Support & Accelerated Resolution

  • File technical Support Requests within vCenter: Use vCenter Support Assistant to file support requests for any product for which you already have VMware (not OEM) support entitlements – regardless of whether that entitlement is via subscription, or paid-for incident packs.
  • Collect and attach diagnostic information and other files: With just a few clicks, vCenter Support Assistant can directly generate log support bundles from vCenter Server and vSphere. You can also easily attach other files, such as screenshots, to your support request. Files are sent securely over SSL.
  • View existing Support Requests: Easily view the status of your existing support requests, add comments for VMware Support, view email exchanges, and select further diagnostic information or other files to upload

How to configure vCenter Support Assistant

Installing the OVF file is very straight forward, after installing the appliance follow the steps below to configure vCenter Support Assistant.

  1. Open a browser and login to the VMware Support Assistant portal by going to http://ipaddress. Login as Root and the default password of vmware

  2. Accept the license and click on Next

  3. Enter the vCenter Server you want to connect to in the format of htts://vCenter_Server_IP:7444 and click on Next

  4. Enter the vCenter SSO username and password for and click on Finish

  5. Check the box next to your vCenter you want to monitor and enter in the username and password you want to use for collecting logs.

  6. Enter a proxy if it applies else click on Next
  7. Optionally enter an email address and click on Finish

  8. You will then see the following screen
  9. Now login to vSphere Web Client as SSO user

  10. In the Home page you should now see a new vCenter Support Assistant icon. Click on it.
  11. Click on Manage tab and click on Enable to setup Log gathering
  12. You can change the default Collection schedule by click on Edit

  13. If you go back to the Support Assistance portal you will should now see that Proactive Support is now Enabled. Click on Test Connectivity to verify everything is working as well.

How to Create a Support Request

  1. Login to the vCenter Web Client and go to Home > vCenter Support Assistant
  2. Click on Manage > Support Requests and login with your active VMware support account
  3. You now have the options to create a new VMware support request without calling it in. Also you can track and modify the open tickets as needed.
twitterpinterestlinkedinmail


vSphere 6 – How to Join vCenter and PSCs to Active Directory

If you are unable to add Active Directory group permissions to your vCenter 6 environment, then most likely your settings are not configured correctly. The following guide goes through the entire process, however your environment might just be missing one of the processes mentioned in this guide.

Step 1: Configuring vCenter/PSC Nodes for Active Directory

We first need to join our PSC and vCenter to Active Directory

  1. Login to vSphere 6 Web Client as Administrator@vsphere.local
  2. Click on Home > Administration
  3. Click on System Configuration
  4. Click on Nodes under System Configuration
  5. If you have external PSC you will need to select your PSCs, if you built vCenter in Embedded mode then just select your vCenter under Nodes
  6. Click on Manage > Active Directory > Join
  7. Fill in your Active Directory information and click on OK

  8. Repeat the process for any other PSCs if you more than one then reboot the PSC or vCenter Server for it to apply

Adding Identity Sources to vCenter

Now that our PSCs and vCenter are joined to Active Directory we want to make sure our Identity sources such as Active Directory are listed in vCenter.

  1. Login to vSphere 6 Web Client as Administrator@vsphere.local
  2. Click on Home > Administration
  3. Click on Configuration
  4. Click on Identity Sources > + Sign
  5. Fill in the information and click on OK
  6. You should now be able to Add Active Directory permissions to your vCenter, Host, Cluster, etc.
twitterpinterestlinkedinmail


vSphere 6 – Fault Tolerance Configuration Guide (Part 1)

In the event of server failures, VMware vSphere Fault Tolerance (vSphere FT) provides continuous availability for applications with as many as four virtual CPUs. It does so by creating a live shadow instance of a VM that is always up to date with the primary VM. In the event of a hardware outage, vSphere FT automatically triggers failover, ensuring zero downtime and preventing data loss. Like vSphere HA, it protects against hardware failure but completely eliminates downtime with instantaneous cutover and recovery. After failover, vSphere FT automatically creates a new, secondary VM to deliver continuous protection for the application.

vSphere FT offers the following benefits:

  • Protects mission-critical, high-performance applications regardless of operating system (OS)
  • Provides continuous availability, for zero downtime and zero data loss with infrastructure failures
  • Delivers a fully automated response


Preparing the vDS Switch for Fault Tolerance


  1. Login to vSphere Web Client


  2. Click on Home > Networking


  3. Right click on vDS switch and select Distributed Port Group > New Distributed Port Group


  4. Provide a name for the Fault Tolerance Port Group

  5.  

  6. Edit the amount of ports and click on Next


  7. Click on Finish


  8. You should now see a Fault Tolerance port group

Next we need to prepare the Host for Fault Tolerance (Part 2)

http://www.vmignite.com/2015/10/vsphere-6-vsphere-fault-tolerance-configuration-guide-part-2/

twitterpinterestlinkedinmail


vSphere 6 – Fault Tolerance Configuration Guide (Part 3)

How to Enable Fault Tolerance for a Virtual Machine


  1. Right click on a Virtual Machine and select Fault Tolerance > Turn On Fault Tolerance


  2. Click on the dropdown and select Browse…


  3. Select a different Datastore than the one currently used and click on OK

  4.  

  5. Repeat the process for each file and make sure Compatibility checks is succeeded and then click on Next

  6.  

  7. Select a different Host and click on Next

  8.  

  9. Click on Finish

  10.  

  11. Once completed you will notice your VM is now a dark blue color. Click on the VM and select Summary, you should now see a Fault Tolerance section with the Fault Tolerance status in a Protected state

  12.  


    Test Fault Tolerance Failover


    1. Right click on our FT virtual machine and select Fault Tolerance > Test Failover

    2.  

    3. Once completed you should now see that the Secondary VM location has changed to a different host


    twitterpinterestlinkedinmail


vSphere 6 – Fault Tolerance Configuration Guide (Part 2)

Preparing the Host for Fault Tolerance


  1. Click on Home > Host and Clusters


  2. Select a host and click on Manager > Networking > VMkernal adapters >


  3. Select VMkernel Network Adapter and click on Next


  4. Choose Select an existing network and click on Browse


  5. Select the Fault Tolerance port group we selected earlier and click on OK


  6. Click on Next

  7.  

  8. Select Fault Tolerance logging


  9. Select Use static IPv4 settings and click on Next


  10. Click on Finish


  11. You should now see your new VMkernel adapter

  12.  


  13. Repeat these Same Procedure for each host you want to Enable Fault Tolerance


How to confirm your Host is ready for Fault Tolerance


  1. Click on Home > Host and Clusters


  2. Select Host > Summary and under Configuration verify that Fault Tolerance displays Supported


Now we need to enable Fault Tolerance to our Virtual Machine (Part 3)


twitterpinterestlinkedinmail