This is an updated guide on how to backup your customized work on vROPS version 7. I highly recommend to backup all your customized Dashboards, Reports, Alerts, etc. once every month. This is just an option to back up your settings. To fully backup vROPS you will still need to use traditional VM backup software.
Important Tips
- Only backup content that is customized, no need to backup default stuff. Hopefully you have labeled everything that is customized with a prefix such as “custom-report A, custom-report B, etc.” this allows you to filter it out easier.
- Backup all active policies, go to Administration > Policies to view all active policies. The one with a “D” next to it is the default policy. It might be a good idea to screenshot this as well
- You will need to backup all Super Metrics if they are being used on dashboards and views, recreating the Super Metric will not work. Backing up the policy will also backup the Super Metrics, however it is also best to backup both.
- If other users have created custom dashboards, make sure you show them how to back up their stuff. Or you can use the new ownership feature of vROPS. See Sunny Dua’s post on this here.
- If you are starting vROPS from scratch again, use this opportunity to download the latest version of vROPS, third party Adapters, and EPOPS plugins.
Step 1 – Backup all Exportable Data
-
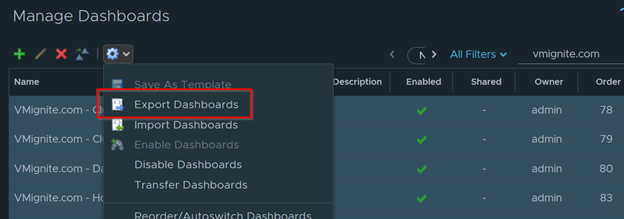
Go to Dashboards > Actions > Manage Dashboards
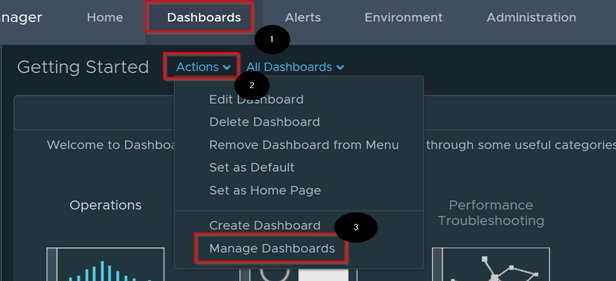
- To export, highlight the dashboard you want to export and click on Export
- Repeat these steps for everything else on the checklist below
- Views (Dashboard > Views)
- Reports (Dashboard > Reports)
- Alert Definitions (Alerts > Alert Settings > Alert Definitions)
- Symptoms (Alerts > Alert Settings > Symptom Definitions)
- Recommendation (Alerts > Recommendations)
- Super Metrics (Administration > Configuration > Super Metrics)
- Policies (Administration > Policies > Policy Library)
-
Custom Groups (Environment > Environment Overview)
Step 2 – Screenshots settings for the following (Optional)
Taking screenshots are optional, but will make the process of doing a full recovery easier. Screenshot the following below only if you are using the features listed, also remember to make multiple snapshots if you have more than one (for example: multiple notifications)
- Notifications (Alerts > Alert Settings > Notifications Settings)
- Applications (Environment > Applications)
- Custom Datacenters (Environment > Custom Datacenters)
-
On the Administration Tab screenshot these if you are using them
- Access Control
- Authentication Sources
- End Point Operations
- Maintenance Schedule
- Optimization Schedule
- Cost Settings
- Collector Groups
- Credentials
- Global Settings
- Licensing
- Log Forwarding
-
Outbound Settings
- Access Control
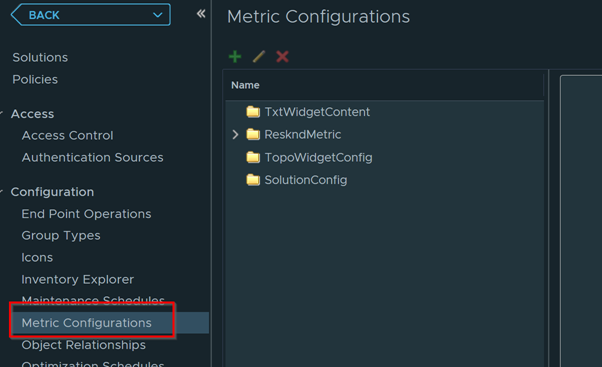
Step 3 – Backup Manage Metric Config
If you’ve created these files, you will need to backup the ones you created only. The vendor metric configs will get restored when you reinstall the adapter.
-
Go to Administration > Configuration > Metric Configurations
- Expand ReskndMetric and select the config file you want to backup. Copy everything on the right side of it and paste it into a separate Notepad text file. Make sure you save it as the same name.
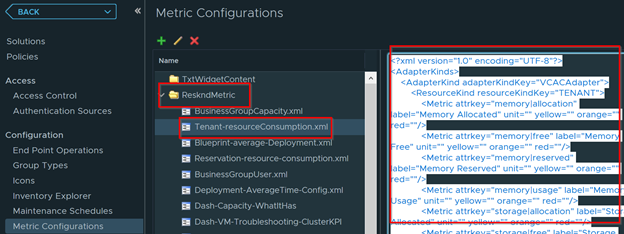
- Repeat this process for TxtWidgetContent