Below are some vRealize Operations Manager configurations settings that I setup on a daily basis at customer’s sites. We cover all the basic settings and also optional settings that might come in handy based on a certain need.
Adding a vCenter Instance
-
Click on Administration > Solutions

-
Select VMware vSphere and click on the configure button


-
Complete the Adapter Settings
- Enter a Name
- Enter a vCenter Server
- Enter the credentials to the vCenter Server
- Click on Test Connection and verify that the connection is successful

-
Click on Manage Registrations – this step registers vROPs to vCenter so that you can see badge scores in vCenter Web Client

-
Check the box Use collection credentials and click on Register

-
Click the
 sign on the left side to add an any additional vCenter Instance
How to Enable Actions
The vCenter Python adapter allows you to do Action commands from the vROPs interface to quickly remediate issues without the use of logging into vCenter
-
Under Administration > Solutions > vCenter Adapter under vCenter Actions click on Enable

How to edit vCenter Monitoring Goals
Monitoring goals allows you to change some specific policies settings which can also be found under Administration > Policies
- Click on Definite Monitoring Goals
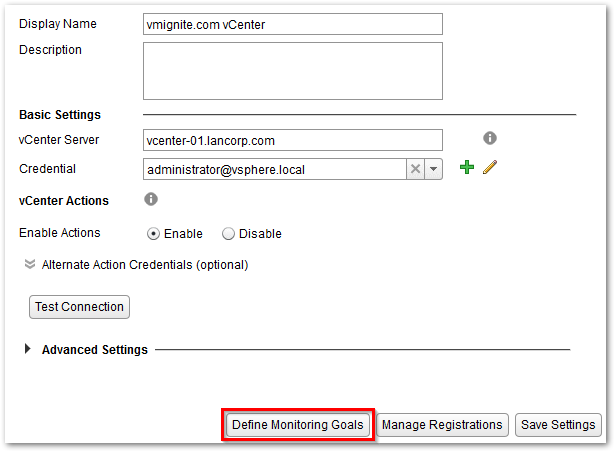
- Edit the settings and click on Save when completed. Click on Learn More if you learn more about the setting you are modifying.

Configuring Active Directory with vRealize Operations Manager
The following steps allows you to integrate Active Directory into vRealize Operations Manager
-
Click on Administration > Authentication Sources > + Icon

- Configure the settings and click on Test and then OK when completed

Configuring SMTP Email Settings
The following allows you sync your Email server with vRealize Operations Manager. This can be later used for emailing alerts and for emailing reports.
-
Click on Administration à Outbound Settings > + Sign

-
Select Standard Email Plugin

-
Configure the settings and click on Test and then Save when done

Configuring NTP Settings
Time settings is really important in vRealize Operations Manager. Make sure your NTP is setup correctly.
-
Click on Administration à Cluster Management

-
Select the Node (1) you want to set NTP for and click on Action > Network Time Protocol Settings

-
Enter NTP Server and click on Add and then click on OK when finished

Changing vROPs Global settings
To manage how vRealize Operations Manager retains data, keeps connection sessions open, and other settings, you can modify the values for the global settings. These system settings affect all users.
With global settings, you set times to delete objects, set timeouts, store historical data, use dynamic threshold and capacity calculations, and determine how vCenter Server users log in. For automated actions, you can select whether to allow actions to be triggered from alert recommendations automatically.
-
Click on Administration > Global Settings >


-
Modify the settings you want to change and click on OK.
Here are some important Global settings.
- Session Timeout – changes how long vROPs will log out of the application once being idle for the set amount of time
-
Time Series Data – Number of months that you want to retain the collected and calculated metric data for the monitored objects

Changing the Background Color
vRealize Operations Manager allows you to change the background color to light (default) and to a darker color.
-
Click on <Username> > User Preferences in the top right corner

-
Change the Color scheme to Dark and click on OK

-
You should now have a darker vROPs

Integrate with Log Insight
The latest update on this is written here http://www.vmignite.com/2017/03/vrops-6-5-how-to-integrate-log-insight-with-vrops/